


First Cuts! Kicking Off the Storage Shed Build
In this episode I'm excited to be getting started with the storage shed project. There's also a slight change of plans inside...

New to The Woodworking Shed? I’ve got you covered! I've made this handy index page to find every episode in this series and more!
Here’s a link to the previous episode!

The Shed Build Begins
Welcome back to The Woodworking Shed! This week, I’m getting started with my exciting new woodworking project: Building a storage shed!
I’ve been itching to get back on the tools and get started with this storage shed build. I’m highly motivated by the fact that once this project is finished, The Woodworking Shed will be empty and I’ll be one big step closer to having a workshop.
In this episode, I’ll be covering an unexpected change of plans, tools, and getting started with cutting the frame material. Let’s dive in!
A Slight Change of Plan
The original plan was to build a 9’ x 4’ shed with mixed use for storage and recycling. That was before the local council decided to get involved!
We received a letter in the post the day before my wood delivery was due to arrive that said they were changing the recycling system. You can imagine how that went down I'm sure!
The new system makes the recycling part of the shed completely redundant so it's been removed. I'm also going to reduce the size as the only reason it was so big in the first place was for the recycling.
The new shed will be 6’ x 4’. I haven't changed any of the drawings because I don't want to delay this project any further! It's only 3’ narrower, I'm sure it'll be fine… right?
Making a Sawing Jig
While waiting for the shed material to be delivered, I decided to try and make something practical. There’s a lot of sawing to be done during the build, so I figured, hey, let’s build a jig for sawing!
The idea was to make something that can be clamped against a cutting line to provide a guide for the saw. In my head it it was going to help keep cuts straight and improve my muscle memory. Was it going to work? Who knows…
It was easy to build even with my current backwater setup! I cut two pieces at 45 degrees and glued them together. I then attempted to flatten it as best I could using sandpaper and a piece of slate, and I even spent some time rounding over all the edges.
Here’s the finished product. It looks alright, maybe it will even work!

Delivery Day!
A very exciting scene to come home from work to - On a Friday of all days, too! It took about half an hour to lug it all into the back garden.
Most of the 2” x 2” was relatively straight, so that’s good. The same goes for the shiplap. There was one piece that was split on one end. Though this shouldn’t be an issue, as I bought enough material to build a bigger shed!

Shed Building Toolbox
As I’m building this shed by hand, I need to figure out which tools I’m going to use. Here is a list of the essential tools for this project:
Hand saw
Hammer
Carpenter Square or Combination Square
Tape measure
Pencil
Knife
Clamps
If you don't have a carpenter's square, a combination square will do fine! I bought the carpenter’s square for this project, but I didn’t know if I would like it or not so I added the combination square just in case!

Building the Base Frame
The first thing that needs to be built on any shed project is the base. The frame is made up of two 6-foot pieces for the long side, and 5 pieces 4-ish feet long for the sides and supports. Why ish? You’ll find out later!
Here’s the finished base frame so you can see what I’m working towards.

Time to get chopping!
Making the First Cuts
Measuring off the 6’ front and back pieces is as simple as running a tape measure and marking off with a pencil!

Then, scribe the width with a carpenter’s square/combination square and pencil. With the first piece marked up, it’s time to test out the sawing jig!

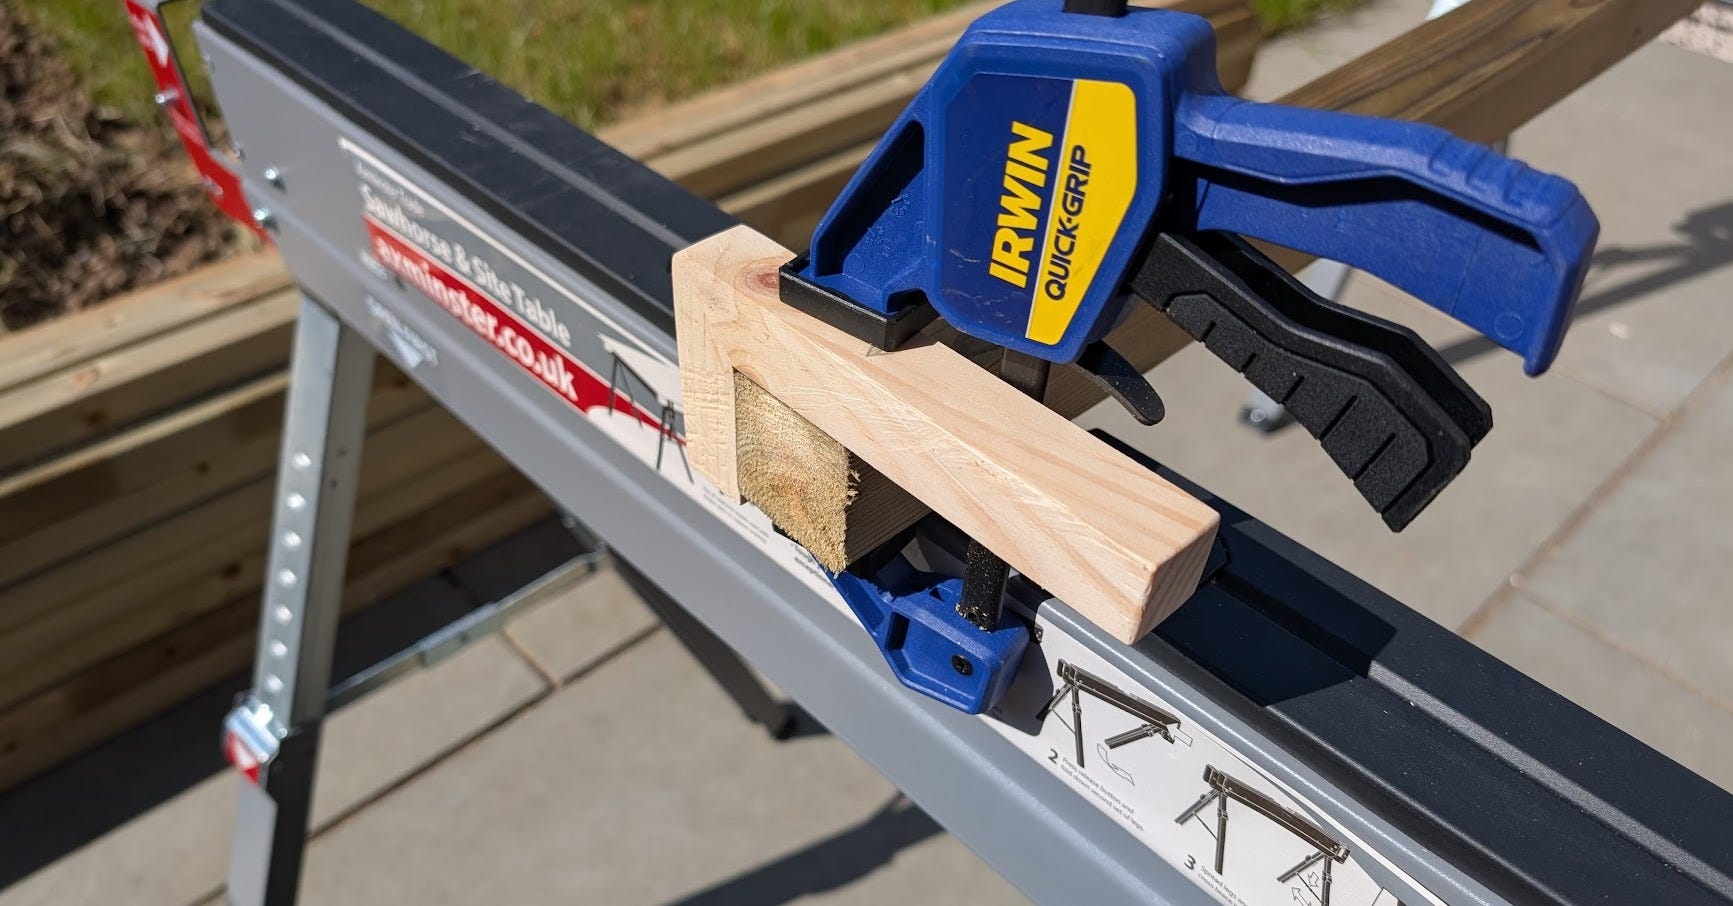
The jig was clamped along the cut line as close as I could get it.

Leaning the saw slightly into the jig definitely helped with keeping the saw straight when getting the cut started! I was careful not to apply too much sideways pressure as the thin blade on the ryoba will quite easily flex and track off in a different direction - Ask me how I know!
The view post cut looked pretty good! But I couldn’t just leave it at that, so out came the combi square for a quick check. It wasn’t perfectly square, but it’s definitely square enough for a shed frame. Happy with that.
Did it make a difference? No idea. It could have been a healthy combination of jig, skill, and pure beginner’s luck!
There is one obvious drawback, though! The time needed to line up and clamp this jig onto the piece each time will soon add up across the project.

When Metric Meets Imperial
With the side rails cut, it was time to measure up and cut the 5 cross supports. I got a fresh piece of wood laid out on the saw horse and pulled out my tape measure looking for “4-ish” but… wait…
I don’t actually know how long these pieces are. And measured correctly, I don’t need to either. Let’s get them sorted.
What is important is the material thickness, so I used my vernier to measure, which came up at something like 44.78mm… And just like that, we’re back to a proper measurement scale!

These 5 pieces need to be measured out as 4’ minus twice the material thickness. That’s because the front and back pieces need to be included. It’s easier than it sounds!
First, I measured and marked 4’. Then, using the carpenter’s square, I lined up to my 4’ mark and measured back 89.5mm and made a mark. Now I have the length for the side pieces, I just need to cut one and transfer the line to the other 4.
And I still don’t know how long they are!
Transferring Lengths
Transferring lengths is an easy way to save a lot of time on a project like this. There is no need to measure out and cut all 5 pieces. All you need is one, and it can be used as a template for the rest.
I do this by clamping the template to the new piece and butting up my carpenter’s square
Tip: Make sure the ends are as square to eachother as possible!

This trick will work for other projects too, if the quality of the end is important, just add a little extra so it can be planed square later without affecting the final length!
Making Progress
Getting back on the tools and diving into a new project has been fantastic - And honestly, it’s been nice to have something to write about other than tools for a change!
The biggest takeaway for me so far is how effective the carpenter’s square is. It’s just so efficient! I’ve really enjoyed working with it. It does raise the question of why I’d need a combination square!
The ryoba has been flying through the frame sections too, which boosts my confidence that I won’t concede to the circular saw. Perhaps that will change when it comes to the shiplap… We’ll see!
Everything is cut and ready to be assembled, then it’s on to building the sides. See you next week for more build updates!
How You Can Help!
Just hitting that like button on my posts helps me to get The Woodworking Shed noticed!
If you'd truly like to support my mission to make woodworking more accessible, you can do so by becoming a paid subscriber or by buying me a coffee!
Early bird paid subscribers get 33% off forever!
Your support directly enables the growth of The Woodworking Shed and supports accessible woodworking!
Look forward to hearing from you -
~ The Woodworking Shed
Hungry for more?
Here’s the next episode!

Check out my other content. Head over to the homepage to find it all!

Daniel - smart move on making a second shed for all your family’s non-woodworking stuff. There is a wonderful stage in a relationship with the other person in your life when they say “honey, why don’t you build a second (smaller) shed and put all (their) gardening things in there and have your shed for woodworking alone”. I’m at that point too and drawing up Shed #2.
The other thought for you (which I will be writing about soon) - is rather than try and squeeze your workbench into your smallish shed, make it portable with wheels that can be flipped up so you can wheel it out and work outside on 4 strong legs. We can actually work outside all through the year in the UK unless it is raining and having built my (heavy) moveable workbench I am loving being out in the open and enjoying the good weather. Small garden = large workspace. Look out for that article - it’s been a long time building that workbench but I’m finally getting there. (And PS - never too late to add wheels to your workbench - just don’t scrimp on quality and go for the best you can afford with robust springs and brackets) - good luck and keep up that writing - but don’t be too hard on yourself if you don’t publish every week - Matthew
Daniel - smart move on making a second shed for all your family’s non-woodworking stuff. There is a wonderful stage in a relationship with the other person in your life when they say “honey, why don’t you build a second (smaller) shed and put all (their) gardening things in there and have your shed for woodworking alone. I’m at that point too and drawing up Shed #2. The other thought for you (which I will be writing about soon) - is rather than try and squeeze your workbench into your smallish shed, make it portable with wheels that can be flipped up so you can wheel it out and work outside on 4 strong legs. We can actually work outside all through the year in the UK unless it is raining and having built my (heavy) moveable workbench I am loving being out in the open and enjoying the good weather. Small garden = large workspace. Look out for that - it’s been a long time building that workbench but finally getting there. (And PS - never too late to add wheels to your workbench - just don’t scrimp on quality and go for the best you can afford with robust springs and brackets) - good luck and keep up that writing - Matthew