


Building a Second Shed: A Woodworking Challenge
In this episode I'm introducing a new project! A second shed. I'll be covering the design

New to The Woodworking Shed? I’ve got you covered! I've made this handy index page to find every episode in this series and more!
Here’s a link to the previous episode!

A New Woodworking Challenge!
Welcome back to The Woodworking Shed!
I’ve decided to tackle the massive space constraints in my small workshop by taking drastic measures. So this week I'm taking the first steps towards a new project: A dedicated bike shed!
I know, I know… it’s unexpected, the workshop isn’t finished, and I already announced the workbench. But this project brings improvements to both of those.
Ultimately, this project is all about creating a more functional and efficient workspace for The Woodworking Shed.
Sounds pretty good when you put it like that…
The Existing Headache…
I have mixed feelings about this decision because I feel like I really can’t wait to pick up a plane and start making shavings while building my workbench!
But the reality is that all this stuff in the way is a headache - And i think it always will be. Building a new storage shed removes this headache. It will make finishing the workshop much easier, it will let me build a bigger workbench, and have a better workshop layout.
It means that The Woodworking Shed will no longer be a shared space - Which is something to get excited about!
Here’s a glimpse at what I’m dealing with… All of this will be gone!

The benefits of this delay massively outweigh the slight disappointment I’ve had recently. I’m over it now and actually quite excited to be sharing this new project.
And besides, it’s still woodworking, just not the kind I had planned for (yet)!
Pulling The Shed Concept Together
So… Bikes… Storage… Easy right?
I figured that since i was taking on this project I could solve two problems at once! Our local recycling system involves various different containers for different recyclables… It’s a good system but it means we have ugly boxes everywhere!
To fix this I’m going to include a little recycling center into the bike shed design to neaten up our back garden. I was going to just add an extra door with some shelves behind it but I thought it would look much nicer with each recycling box having it’s own little door.
I’ve decided that the overall size should be 9’ by 4’. This is broken down into two sections, 7’ by 4’ for the bike storage and 2’ by 4’ for the recycling addon.
The “storage” portion of the current shed is approximately 6’ by 3’ so there will be plenty of room for other bits and a bit of “future proofing”.
After spending a little time with the sketchpad this is what I’ve come up with. I’ve coloured it in at the level of a 6 year old for visual appeal…

Overall, I’m pretty happy with it as a design - It got executive approval too!
I’m sure the final product will differ slightly but it’s good to have a picture to work towards. However, I can’t build it with just a concept image, I need to draw some details too - Back to the drawing board.
Getting to the Point
Right. Pencil's sharp and at the ready…
Oh dear. Perhaps a little too sharp… Moving swiftly on!
Ironing Out the Details
I’m going to follow the typical panel assembly style used in shed design:
Build the base
Build 4 wall panels
Screw them together
Add the roof
I’ll build and add the doors into the front panel at the same time. I’m not sure if this is the best way but it is how my shed was delivered and it seems much simpler than trying to hang doors later. Especially since I’m doing this alone!
The framework will mostly consist of butt joints (hehehe) nailed together just like the framework of a house. I don’t have access to a nail gun so I’ll be nailing everything by hand! At least I have an excuse to buy a better hammer now.
Any (not expensive) recommendations?
I did think about using my drill, but… Screw that!
To add a little more interest and excitement, I'm going to add some birdsmouth joints for the roof. They aren’t necessary for a storage shed, but it will make the structure stronger. It also gives me an excuse to try something new!
Whoops, I almost forgot about material…
I'm going to build the framework entirely out of treated 2” by 2” pieces. It's cheap, readily available and more than up to the task for a storage shed.
The framework will be clad with shiplap cladding which should add additional strength. If it all goes to plan I think it'll be quite a sturdy storage shed!
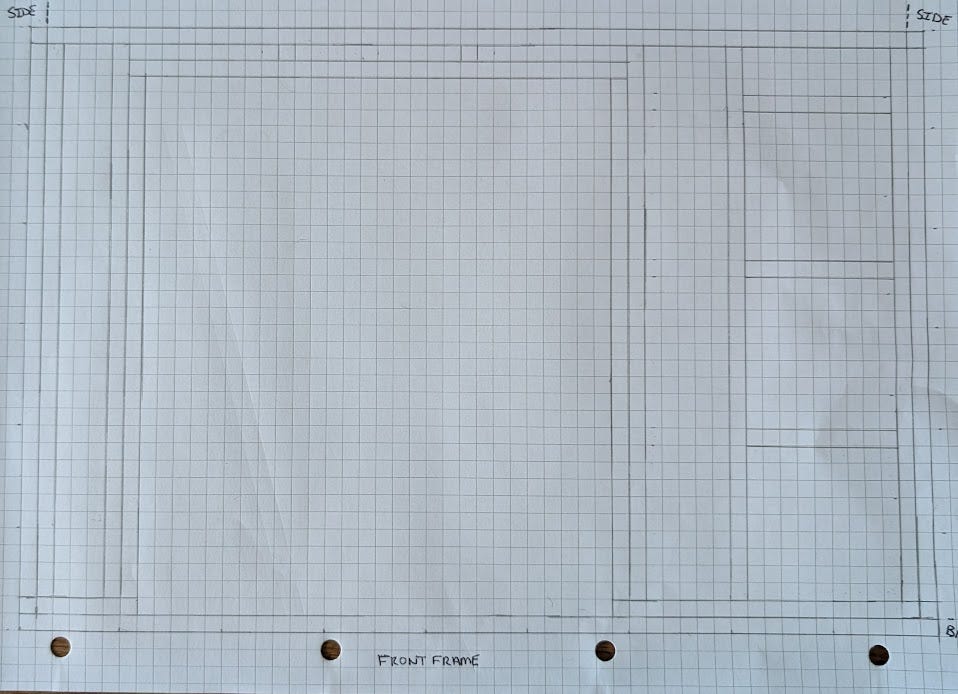
Shed Framework Design
Enough waffling on. Let's look at the drawings!
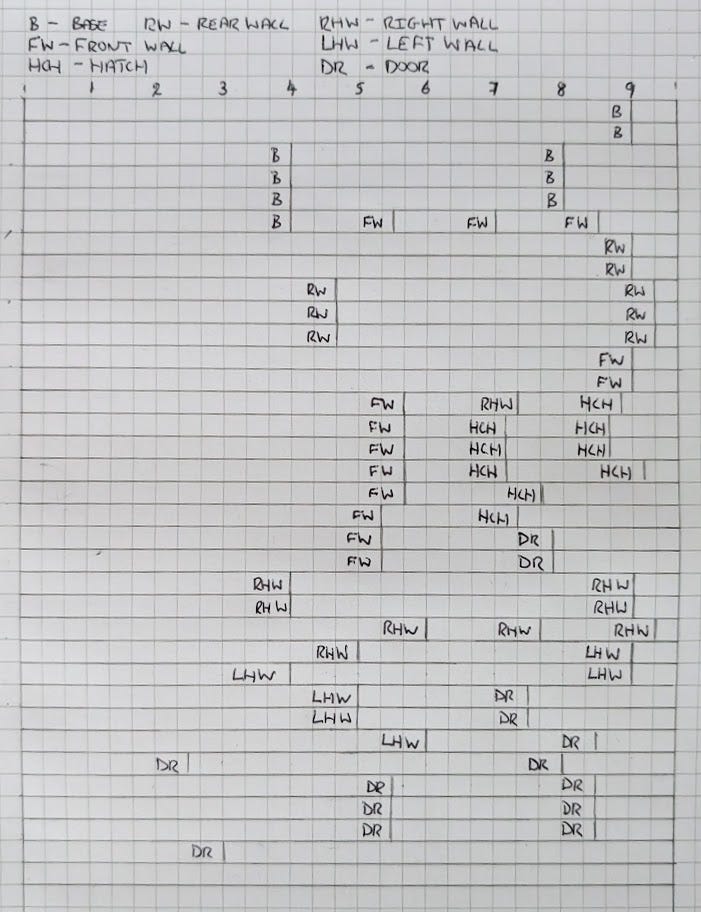
I’ve added extra support to the framework around the doors to support the hanging weight.
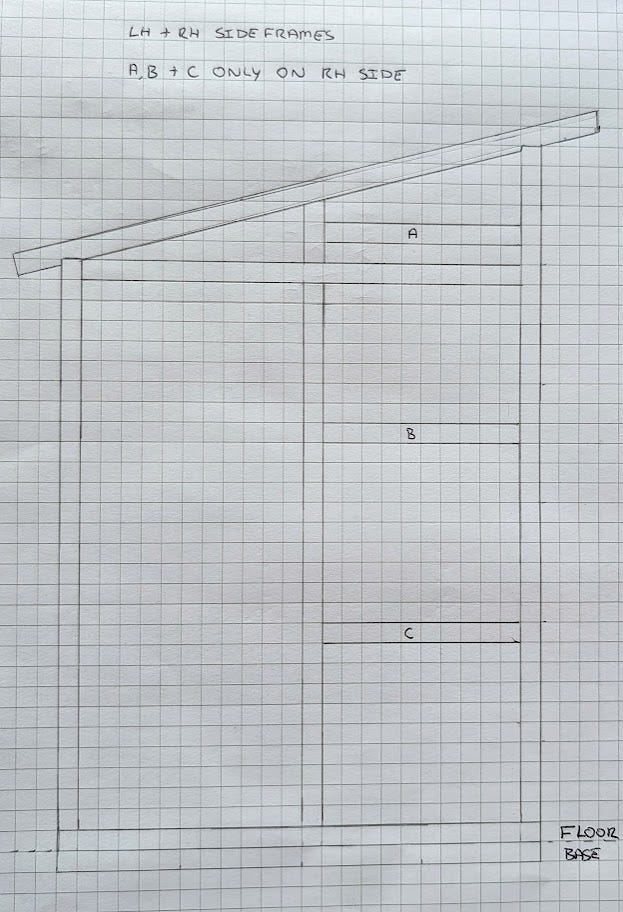
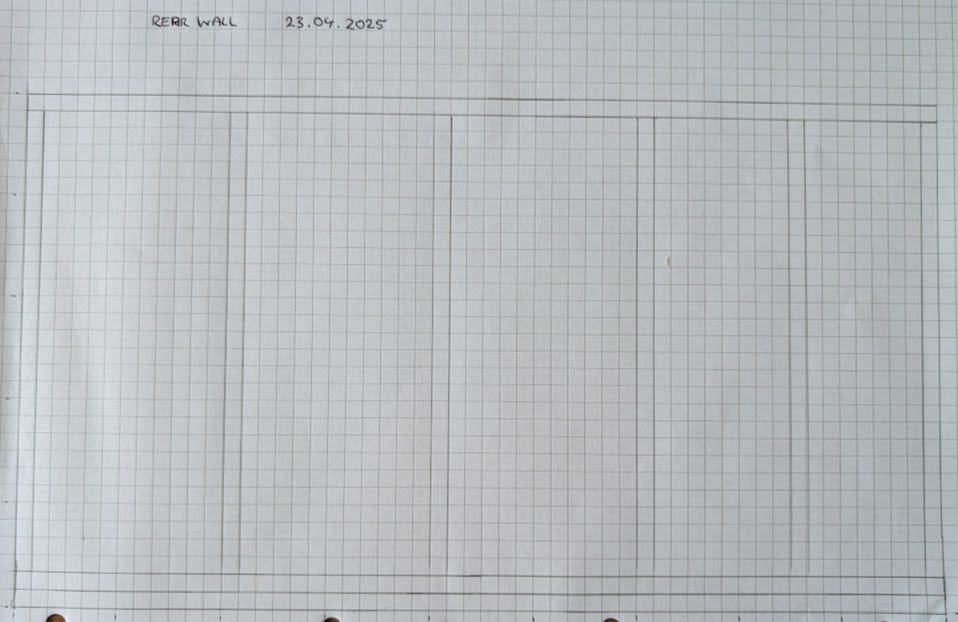
I didn’t draw both sides as they are the same, what I did do was include the support beams for the recycling shelves which will only be fitted on one side!
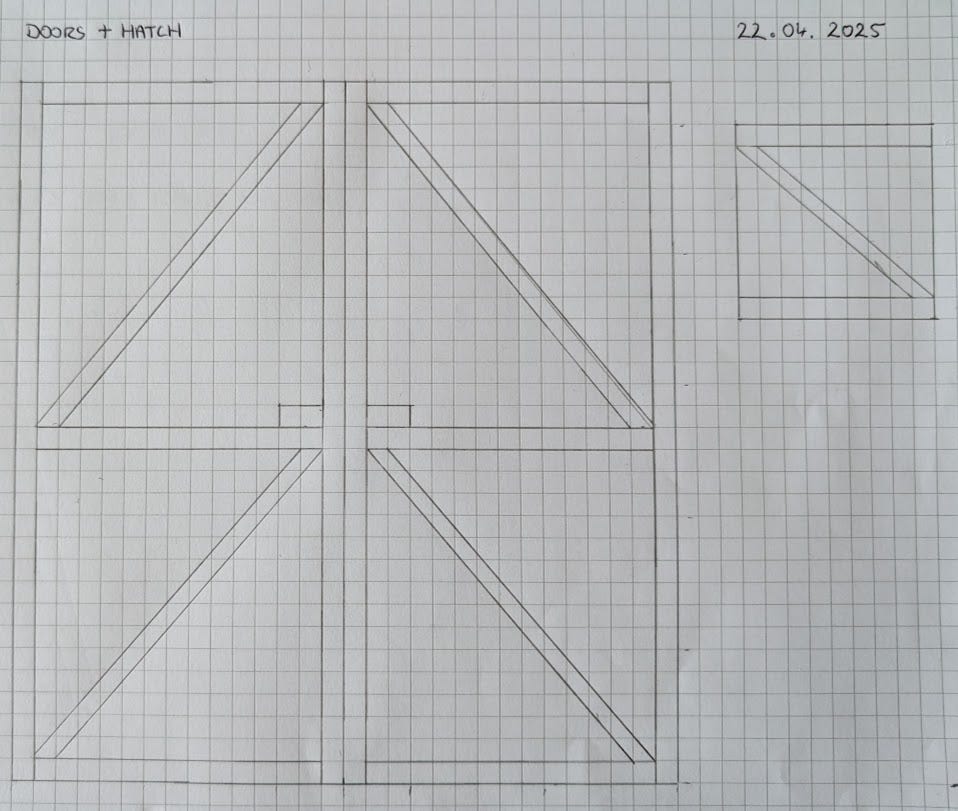
The design for the door is based on the doors for The Woodworking Shed, and my garden gate! I’m pretty sure they’ll hold up!
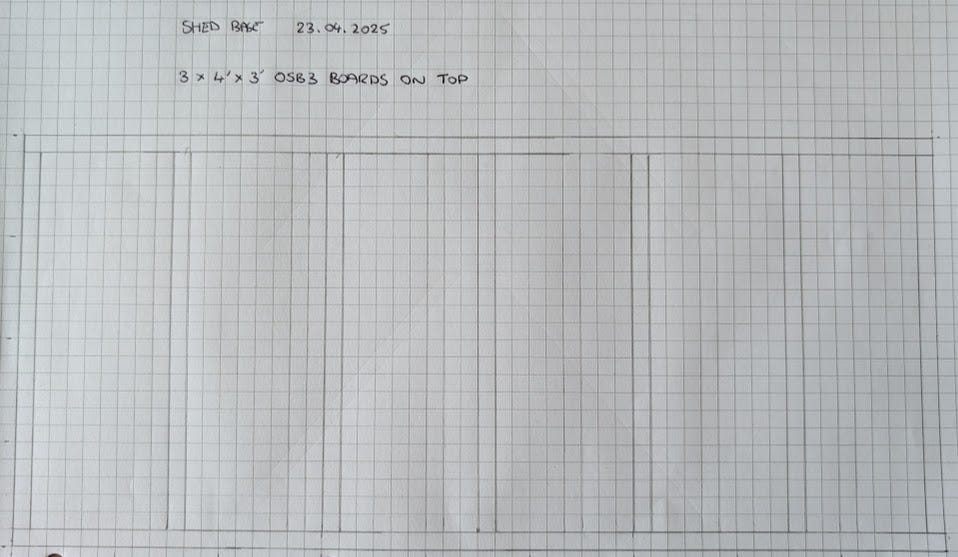
The foundation of it all! Equally (almost) spaced floor supports for the OSB sheets that will be added! Will be more than enough for storage.
Basically a less sturdy version of the floor!
I think it’ll be pretty sturdy! It's no fort Knox but it'll be be more than enough for a bike shed.
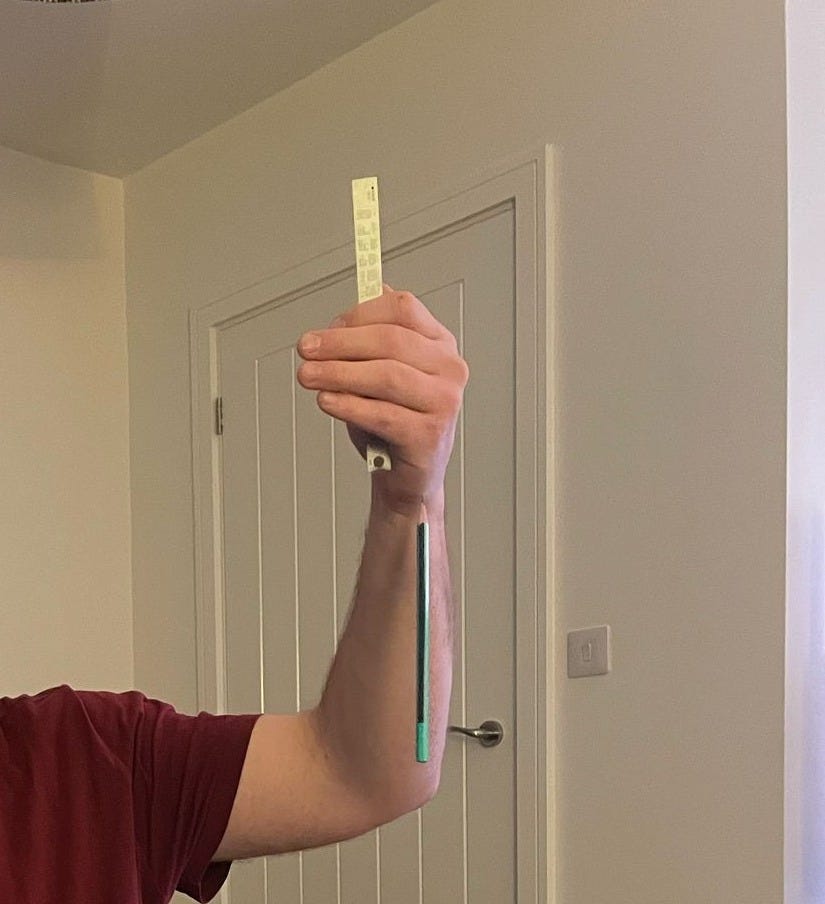
All of the drawings are to scale but I haven't dimensioned them. I thought about it but it would take too long and I’d rather crack on with building it! I can read them from the scale easily enough (6 squares is one foot).
Sourcing Material
Drawings are only half the battle, I need to figure out how much material I need to buy to build the thing! To do that I’ve transferred all of the individual lengths into a simple cutting list. This gives me a nice list of cuts to make to build the framework.
I won’t even try to explain how I calculated the cladding, there was some math involved and frankly, I’m not even sure it’s right!
Time will tell…
Challenges Ahead
There's going to be a few new challenges for me in this project.
Firstly, there's a lot of sawing to do… and I'll be doing it all by hand! If I can't saw straight by the end of this project who knows what I'll do!
The birdsmouth joint will be the first proper woodworking joint I attempt. It's a little out of the ordinary for a new woodworker but it's still an exciting challenge I'm looking forward to.
Lastly, the one I'm the most anxious about... Building the doors. I'm sure it'll be fine - it's a shed door not a vault door. What could possibly go wrong?!
I'm excited to get started with this new challenge and I'm even more excited to see The Woodworking Shed empty! Can you tell i’m raring to go? See you next time!
What other challenges do you think I'll face? Let me know in the comments!
How You Can Help!
Just hitting that like button on my posts helps me to get The Woodworking Shed noticed!
If you'd truly like to support my mission to make woodworking more accessible, you can do so by becoming a paid subscriber or by buying me a coffee!
Early bird paid subscribers get 33% off forever!
Your support directly enables the growth of The Woodworking Shed and supports accessible woodworking!
Look forward to hearing from you -
~ The Woodworking Shed
Hungry for more?
Here’s the next episode!

Want to check out my other content? Head over to the homepage to find it all!

Good plan, Daniel. I think this will certainly relieve some stress:). I must say, however (because who can resist giving unwanted advice?) …
* I suspect you’ll quickly tire of opening three separate doors to deposit your recyclables—if it was me I’d be opening two or three just to find the right bucket. But this is easily solved by retrofitting a single handle that spans all three doors so pulling on the center opens the lot. Hah.
* I laugh when you say you’ll be cutting all the shiplap by hand—good on ya for that, though I’m reminded of C.Schwarz writing of how he sold his power miter saw because he could cut miters faster and more accurately with a hand miter box .. until the day he had a job-lot of cutting to do—he bought another miter saw and never looked back.
* There IS a place for power tools. A circular saw and a speed-square will save some effort. Or exercise your elbow. Either way, you need to measure and cut accurately. Your call :)
Hi David thanks for the reply!
It's definitely going to relieve a lot of stress haha
I actually love the single handle idea though if I'm to go that far I may as well do one door! I did say the design may change slightly as I go through with the build so we'll see!
It's good to have a goal! But I do have a circular saw to hand if the shiplap becomes too much... I'll definitely be doing all the framework be hand though. Time will tell!
I'll be sure to measure everything twice. Thanks for the great feedback!