


The Build Continues: Cladding Chaos, Hammer Heroes, and Fixing My Own Blunders!
This week, we're navigating the ups and downs of building shed walls – from stubborn cladding and essential tools to a "perfect" frame that needed a little (okay, a lot of) fixing.

The Build Continues!
Welcome back to The Woodworking Shed! This week, we're making serious progress on the shed walls, tackling the satisfying (and sometimes frustrating!) art of cladding.
You'll get to see the transformation, and the lowdown on an awesome hammer that's become my new favourite tool! We’re even talking paint jobs (a management decision, of course!).
In the background, I’ve been working to finish up the framework for the rear wall, which has turned out perfectly. There is absolutely nothing wrong with it, honest!
There’s a lot to cover this week, let’s dive in!
New to The Woodworking Shed?
Catch Up: Explore every episode in this series and more on the index page!
Last Episode: Missed the last episode? Dive in here:

Join the Community: Subscribe for free to get the latest projects, tips, and tales from The Woodworking Shed. Let's build something together! 🪚
Cladding The Side Frames
I precut a pile of cladding for the side frames. These pieces are exactly the width of the frame, so I figured I'd start easy. I thought it might be a bit tedious cutting the same thing over and over. In reality, once you get into a rhythm, it goes quickly - sawing is quite satisfying too.

The cladding needs to overhang the bottom of the frame to protect the edges of the OSB floor. It may be rock solid to stand on, but it's only water resistant, so it needs to be covered.
Figuring out the overhang was easy. Using the carpenter square on the side of the finished floor, I took a measurement that looked like it would create a nice overlap: 35mm.

Then, using one of the straighter cladding pieces, I measured 35mm up from the bottom on both sides and marked it.

Once the overhang was marked up it was as simple as lining it up on both sides and nailing it down. Yeah, simple. Every time I got one side right the other side moved… I ended up clamping one side in position while I nailed the other side into place.

Nailing down the rest of the cladding was both satisfying and frustrating. The satisfying bit was how the panel was starting to come together and look quite smart!
The frustrating part… some of the cladding pieces were either bowed or slightly twisted. They can be a nightmare to connect the tongues and grooves! One side goes in the other side pops out…
It's annoying, but I'm yet to have any that were impossible to connect.

For the shed sides, I stopped short of the top. I wanted to leave good clearance for fitting the birdsmouth rafters later and the cladding for them will need to be cut at an angle!
A True Nail Driver
Deciding to assemble the shed framework with nails was an unknown challenge. It could have been easy, or it could have been a disaster! These 75mm nails have to travel a long way without bending, and that’s all down to me…
I bought this hammer specifically for this project, it’s the DeWalt DWHT51004 20oz Rip Claw Hammer, and frankly, it’s amazing!

It’s well balanced and feels great in the hand. I wasn’t sure about the weight as my hammering experience is limited, but it has been perfect. It’s confidence-inspiring, really! It’s earned its place in The Woodworking Shed.
Choosing the Shed's Colour (It Wasn't My Decision!)
You may start to notice a bit of colour here and there moving forwards! The shed is going to be green. Specifically, the colour is called willow.
Now, the choice of colour was a management decision, so any feedback on that will be forwarded up the chain!
Jokes aside, it's a really nice colour and the finished shed should look really smart with it.
I hate painting, so I’ll be doing it as I go. As each panel gets completed, it will be sent to the paint booth (the driveway) for painting. Our driveway is like a wind tunnel at times, so it should work quite nicely!
Spotting The Glaring Error
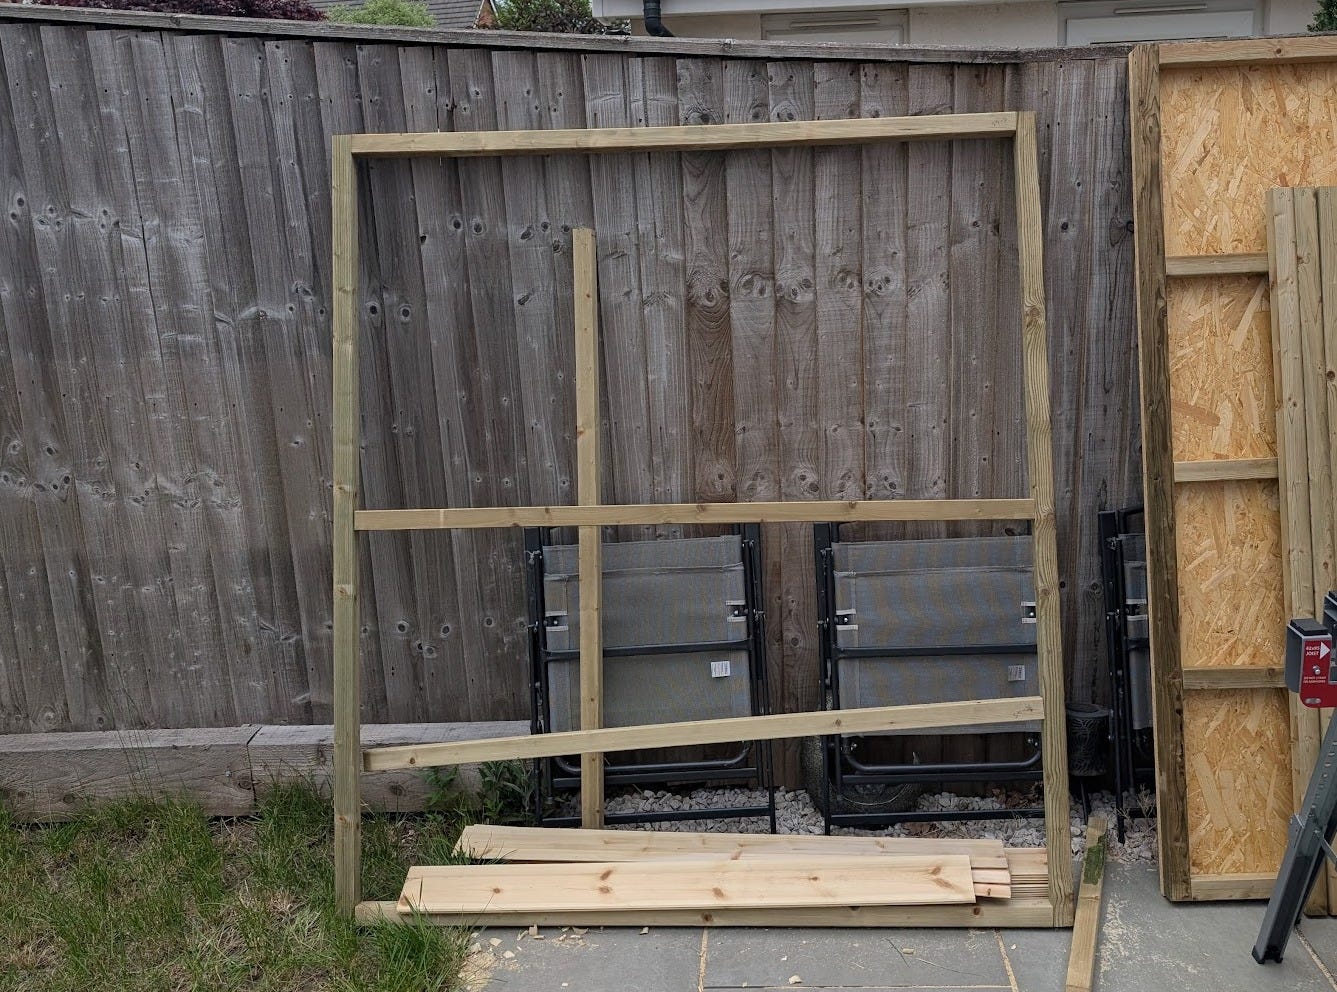
I've been leaning things on the fence to keep them out of the way while working. The frame for the back wall was there for several days before I spotted it… Can you see it?

Did you spot it? Disaster! The obvious mistake is that the lower support is wrong on the left side. But actually… that's the only position that's correct!
Taking the frame apart would be a nightmare! The nails would need to be removed somehow, and if that didn't work, I'd have to start over… I considered just leaving it as it is. It would probably be fine… But I couldn't do that, it had to be right! So, how do I fix it?
A hacksaw could do it, but I don’t have one, and I'd have to open up the gap between the pieces to get the saw in, which would weaken the rest of the frame…
In the end I borrowed my boss’s multi tool for a night as I figured the thin blade would get in between the frame nicely and cut the nails.

It worked a treat! I think I spent more time setting up the tool than actually cutting the nails.
I didn’t replace the supports that were cut out, I just shifted the nail positions and hoped they wouldn’t split - they didn’t. Now that was fixed, I could move on and clad it!

What Actually Went Wrong?
The correct measurement from the wrong reference point…
I wanted all of the supports to be spaced equally, so naturally, all I had to do was measure the distance between the inside of the side and centre support and half it. And I did do that!
From memory, it was around 400mm. I remember that because I thought it was really convenient at the time! When measuring out the other three positions, I mistakenly hooked the tape measure over the edge of the outside supports, a reflex action, maybe.
This error led to three out of four positions being offset be approximately 45mm. If I hadn’t done the first one correctly, I may have never noticed the mistake!
Once again, the adage proves true: Measure twice, cut once. Or in this case, measure twice, nail once.
Cladding The Rear
The cut length for the rear cladding is a little more complicated. I've decided that I want the cladding to be continuous all the way around so it needs to meet up with the cladding on the sides.
Getting the height to match was easy, just use the same 35mm measurement from before. It's the sides that present the challenge…
Because the front and back walls aren't the full width of the shed they also need to cover the end of the side frames, and to be continuous, they also need to cover the cladding on the side frame too.
It was easy enough to figure out the cut length. As the shed base is 6 feet wide and the cladding stands proud of that. The length is 6 feet plus twice the cladding thickness.
Laying out the first piece to nail it down was tricky with two overhangs to factor in. With the two overhangs, I couldn't see the frame to line up with. To deal with this, I made a jig out of a spare piece of frame and cladding from offcuts.
With the jig in place lining up the fits piece was a breeze!

Once the first piece is nailed down, the process is the same as the side panels. Plain sailing! It’s amazing how quickly a few pieces of cladding stiffen up the panel and turn it into a solid wall.

What’s Next?
It’s great to see the shed starting to take shape! Every nail and every cut brings the project one step closer to completion, and one step closer to an empty workshop!
If that isn’t a motivator, I don’t know what is!
There’s still loads to do though… And I’m anticipating more than a few challenges! I still need to tackle the birdsmouth joints, and then there’s the doors… I won’t lie, I’m a little nervous about those.
Once these hurdles are out of the way, it’ll just be finishing touches! The vision of my workshop finally being empty is very motivational at this point.
Stay tuned for the next update!
How You Can Help!
Just hitting that like button on my posts helps me to get The Woodworking Shed noticed!
If you'd truly like to support my mission to make woodworking more accessible, you can do so by becoming a paid subscriber or by buying me a coffee!
Early bird paid subscribers get 33% off forever!
Your support directly enables the growth of The Woodworking Shed and supports accessible woodworking!
Look forward to hearing from you -
~ The Woodworking Shed
Hungry for more?
Check out my other content! Head over to the homepage to find it all!

Great post. I really need to learn how to get the best out of Substack. I cant try to learn too much stuff all at one though lol. Concentrate......